New in Sytist 5.7, Preset Passcode Photos is an advancement of the previous passcode photos where you import a csv file that contains the photo file name and passcode for the photos. This has been called the "older passcode photos" method since the QR Passcode Photos came out and the method mainly used prior to QR Passcodes.
If you have a way to set a passcode for each photo and not using the QR Passcodes, this is the method you want to use. The older method is now called Legacy Passcode Photos which is still available and would be used if you set the passcode in the file name or a keyword.
Please note: If you have existing passcode photos galleries using the "older method" like this, don't change those to preset passcodes. The galleries will need to be created as new galleries.
Overview
- You create a spreadsheet that have the filenames of the photos and the passcodes for those and additional data (example below)
- Upload the photos to Sytist
- Import your CSV file
- Email passcodes to customers
- Customers enter in their passcodes to the find my photos to view and purchase photos
Your Spreadsheet Data (CSV)
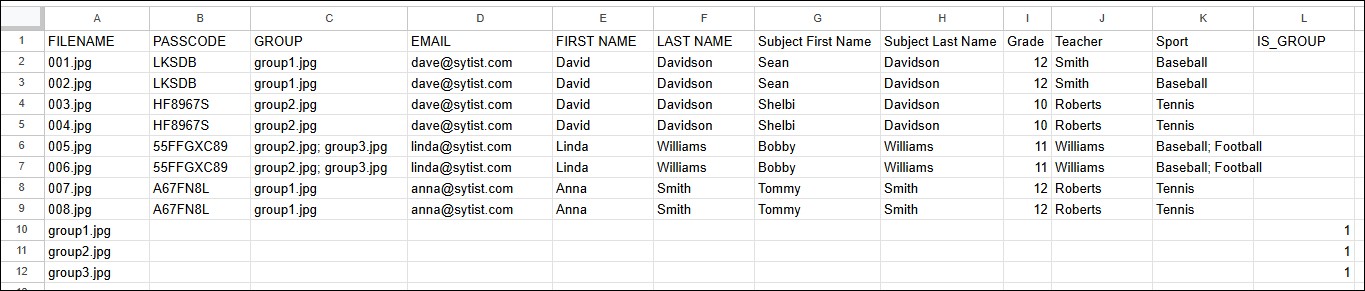
You will have a spreadsheet that contains the filename of the photos and the passcodes for those photos. Below is an example.
Required Columns
- FILENAME: The complete filename of the photo including the file extension. Example: DSC_001.jpg
- PASSCODE: The passcode for the photo file. If a subject has more than one photo, use the same passcode for each of their photos.
If you are using group or class photos
- GROUP: The filename of their group photo. If the subject is in multiple group photos, enter those group filenames separated with a semicolon (;).
Group Photos
When having group photos, you will have a row for each group photo with the filename of the group photo in the FILENAME column.
- IS_GROUP: Enter a 1 in this column that designates the photo is a group photo. Reference the spreadsheet above.
Additional Fields
- SUBJECT FIRST NAME
- SUBJECT LAST NAME
- FIRST NAME: Contact first name
- LAST NAME: Contact last name
- EMAIL: Contact email
- PHONE: Contact phone number
- SECONDART CONTACT FIRST NAME
- SECONDART CONTACT LAST NAME
- SECONDARY CONTACT EMAIL
- SECONDARY CONTACT PHONE
Also 4 additional fields that can be set in the Data Fields.
The Process
Create your gallery and select "Preset Passcode Photos" under password protection. If an existing gallery, select Preset Passcode Photos in the Passcodes section (not legacy passcode).
Upload the photos. Photos have to be upload prior to importing your CSV file.
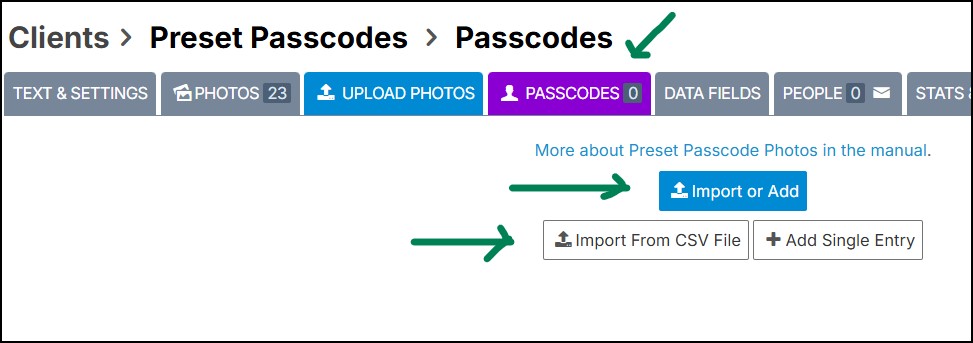
After all of the photos have been uploaded click on the PASSCODES tab then click Import or Add then Import From CSV File.
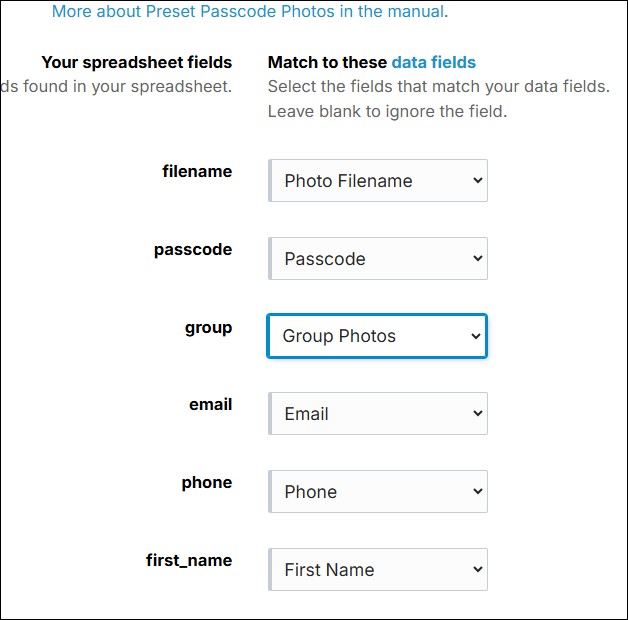
Next you will browse and upload your CSV file then match up the CSV fields to your data fields.
Once you have imported your spreadsheet, it will assign the passcodes to the photos matching the filenames in your spreadsheet to the photos you have uploaded. At this point the photos are ready to be viewed.
Emailing Passcodes
If you have uploaded contact data, you can email the passcodes to the contacts by clicking Send -> Email Passcodes.
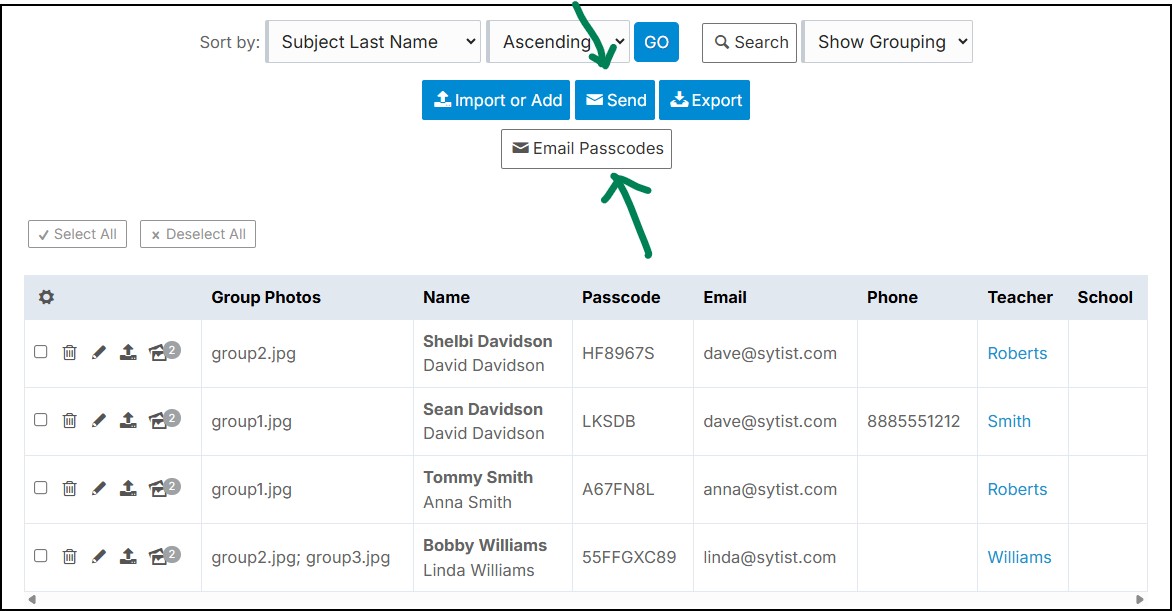
If a parent has multiple children, it will send the passcode for each child in one email.
Notes
You can have a separate price list for group photos. The option is in the price list settings of the gallery.
The filename and group photo fields are automatically added to the data matching when importing your CSV file. Don't create those using the data fields.
If you have uploaded photos and imported the passcodes then upload new photos, you can import the CSV file again and it will assign the passcodes to the new photos and not duplicate existing ones.