The people / accounts section shows you all people that have either created an account or placed an order. Unregistered people are ones that have placed an order without creating an account.
When someone has an account you can view their favorites, assign gallery access, create contracts, view order history, create invoices, view email logs and more.
Other actions:
- Edit - Edit account information and change password.
- Deactivate - Make it so they can not log into that account or create another account with that email address.
- Login - Login into your website as that person.
- Delete - Delete their account but retain other data such as orders, email logs, etc...
- Erase (New in version 2.8) - Completely erase any data of that person.
More about erase.
This was added because of GDPR. Erasing an account will delete all information in the database for that person. This includes their account, email logs (emails sent to them from the website), comments made to pages, mailing list, bookings, contracts, shares, favorites, downloads and any reference found with their IP address or addresses.
Orders are not deleted so the sales stats remain, but their personal information is removed from the orders (name, email, address, IP address, download history, etc...).
Erase People Search
After clicking on People in the main menu of your Sytist admin, there is an Erase People Search in the left menu where you can search for email addresses to erase. This would be used for people that may not have created an account but may have placed an orders, pre-registered for a gallery, sent in a contact form, etc....
Batch Actions
When viewing a list of accounts you can check the checkboxes next to the names to either batch delete or batch erase those accounts.
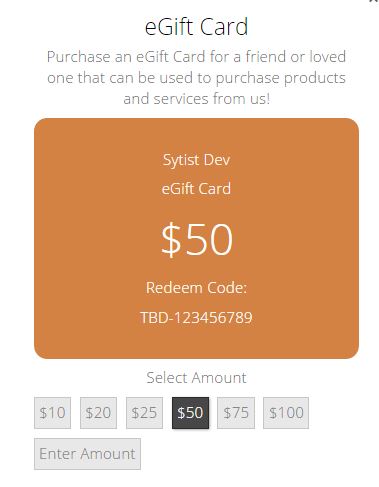 Starting with Sytist version 1.7 is the option to offer eGift cards. eGift cards are basically gift certificates that people can purchase to be emailed to someone else. When someone receives an eGift Card, they will have a redeem code to use and there will be an option at checkout for them to enter in that code.
The eGift Card will deduct from the purchase just like a payment. If there is any amount left over from the eGift Card, it will be added to the customer's account as an account credit.
To enable this feature all you really need to do is go to Design -> Menu Links and edit and enable the link in the menu.
If you rather create a page for it, you can create a new top level page (name it something like eGift Cards), and in the text area of that page, add the bracket code: [GIFT_CERTIFICATES] where you want the form to be displayed.
To add the eGift Card to the main menu or link on a page, use this for the URL:
javascript:giftcertificate(0);
To manage settings for eGift Cards, go to People -> eGift Cards.
Amounts & Settings
Available Amounts
Enter in the amounts you want the purchaser to select from without the currency sign and separated by commas. Example: 10,20,25,50,75,100
Add other amount option for customers to enter in their own amount
This will show an option to the customer to enter in their own amount if they don't want to select from the available amounts.
Show send date
Selecting "Show send date" will allow the person purchasing to select a date for the eGift Card to be emailed. Not selected, the eGift Card is sent when purchased.
If you have automated emails enabled, then it will automatically send the eGift Card email on the date selected. If you do not have automated emails enabled, then you will have to send the email on that date. You will have a notice on your admin home screen when eGift Cards are due to send.
eCard Style
This option allows you to adjust the colors of the eGift Card that is added to the email sent to the receiver.
Language
This area you can change the language and words used when someone is purchasing or receiving an eGift Card.
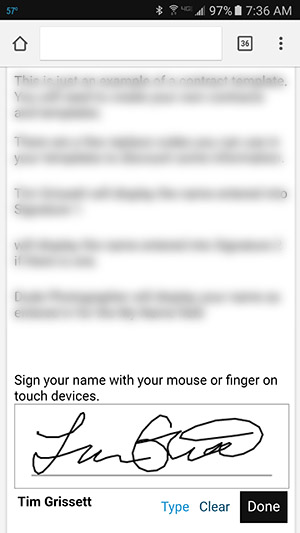
Starting with Sytist version 1.6 is the ability to create contracts and email them for your clients to electronically sign. They can sign by either writing their name with their finger or mouse or typing in their name. You can also attach an invoice for them to make payment on after they have signed the contract.
Here is a sample contract in the demo.
First thing you will need to do to get started with contracts is go to People -> Contracts and click the Directory tab (or the link in the yellow notice). The directory / link needs to be created because the contracts are displayed outside of the design of your site so just the contract is shown. This only needs to be done once.
Next go to Contracts -> Templates and create the contracts you want available (or create a contract for a client and select the save as template option). You can select from these template when creating a contract for a client.
To create a contract for a client, go to the People section and find your client's account. If they don't have one, you can create an account for them. (They do not have to log in to view and sign a contract). Click the Contracts tab in their account then the + Contract button.
When adding or editing a contract:
Title: Title of the contract for your reference (example: wedding contract).
Templates: Select from templates you have created.
Signature 1: The name of the person signing the contract the way they would sign it.
Signature 2 (optional). If a second person (other than you) needs to sign the contract, enter in the name there.
Email 1 & 2: The email addresses of the people signing the contract.
Due Date: The due date is added to the email that is sent to the client.
My Name: This is YOUR name and how you would sign the contract.
NOTE: When you are signing a contract, you have the option to save your signature as your default signature whether you sign it or type it. Once you do that, you will have the option to sign the contract when created with that signature.
Contract: The actual contract.
Attach Invoice: Attaching an invoice that you have created for the client will prompt them to make a payment on the invoice after the contract is signed.
PIN Number: The PIN number is for added security which the client will enter in to view and sign the contract. If you are logged into the admin, you will not need to use the PIN number.
Adding Form Fields
Starting with Sytist version 2.1 is the option to add form fields to contracts to be filled out by the client who is signing the contract. To add these form fields, add the bracket codes below in the content of the contract where you want them to appear.
[TEXT_INPUT_OPTIONAL]
This will be replaced with an optional form field to be filled out with the size of 20.
[TEXT_INPUT_REQUIRED]
This will be replaced with a REQUIRED form field to be filled out with the size of 20.
[TEXT_INPUT_SHORT_OPTIONAL]
This will be replaced with a small optional form field to be filled out with the size of 4 (initials for example).
[TEXT_INPUT_SHORT_REQUIRED]
This will be replaced with a small REQUIRED form field to be filled out with the size of 4 (initials for example).
[CHECKBOX_OPTIONAL]
This will be replaced with a checkbox that is optional.
[CHECKBOX_REQUIRED]
This will be replaced with a REQUIRED checkbox.
Starting with Sytist version 1.1.0 is the Mailing List Feature. This allows you to collect email addresses from customers in a join mailing list form or during the checkout & create an account process.
This will ONLY collection email address for the mailing list. There is not an option to send out emails to mailing lists through Sytist.
WHY?
Because of SPAM it is hard enough to get emails sent from a server into an inbox. And if you were to try and send dozens, hundreds or thousands of emails out at a time, they most definitely will not get into inboxes and your hosting company would probably shut you off. Even if you have a dedicated server, the emails still would not make it into inboxes.
BUT ...
The mailing list feature is integrated with MailChimp which is an email marketing service. You can have up to 2,000 subscribers absolutely free! Email marketing services like MailChimp build relationships with the email providers to get the emails into the inboxes.
To get started with the Mailing List feature, go to People -> Mailing List in your Sytist admin. There you have the option to add a join mailing list at checkout & account creation, add a join mailing list popup, and information on adding it to a page or the footer.
Also connect the mailing list to MailChimp. Click here for an article on how to set up MailChimp into your Mailing List.
Account credits are like money in a customer's account. When a customer has a credit in their account, it will come off the order like a payment. If there is a credit balance after they place an order, it will remain in their account.
To give someone an account credit, the customer must have an account first. If they don't already have one, you can create one in the People section. Click on their name and click the Credits tab.
You can create invoices and email those to your clients. To create an invoice, view the client's account and click the Create Invoice tab. If they don't have an account, you can create one for them.
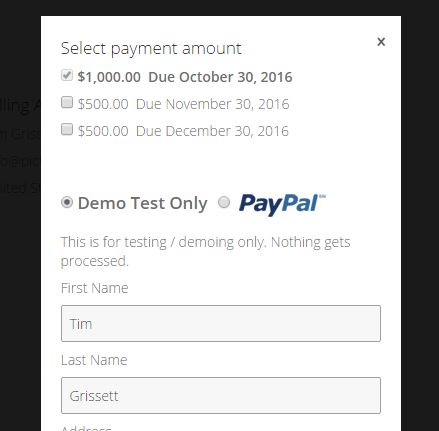 Scheduled Payments
Starting with Sytist version 1.6 are scheduled payments for invoices. This allows you to set amounts and due dates for payments toward the invoice. The customer will have the option to check the payment amounts they are wanting to make and when made, go toward the invoice.
Once you create an invoice, you will see a Payment Schedule tab where you can enter in the amounts and dates due.
You can also set up a payment due reminder email in the Automated Emails section that will automatically be sent out the day before their due date.
Starting with Sytist version 1.6 is the Notes / Activity section. Here you can add notes to a client's account and then notes are only for you to see.
Some activity is logged when sending contracts to a client like when the contract was created, view and signed.

Loading more pages