
After you have created a gallery or page, click the Upload Photos tab to upload photos. This will open the upload photos window as shown below..
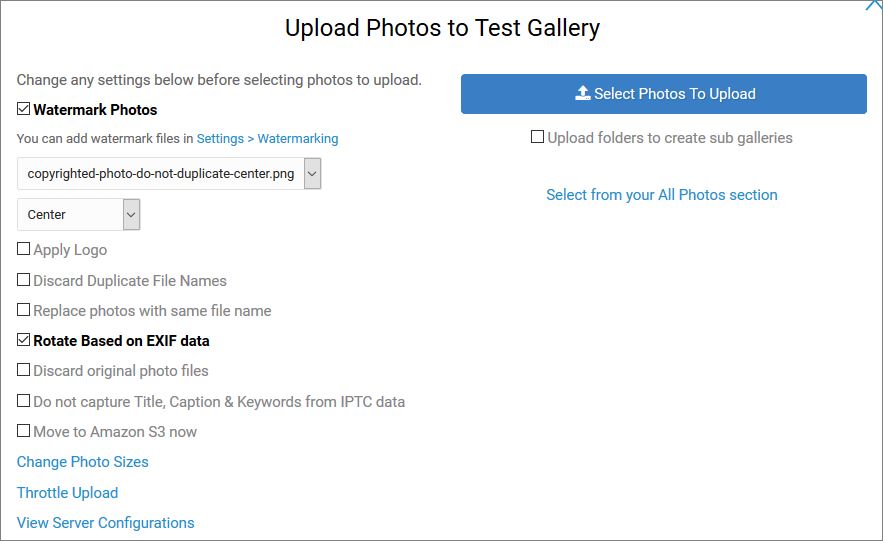
Options
- Watermark Photos - the option to apply a watermark to the photos when upload. You can set the default status of this by editing the sections the pages are in.
- Apply Logo - the option to apply a logo to the photos when upload. This default can also be set by editing the section.
- Discard Duplicate File Names - with this option selected, if a photo with the same file name is found in the same gallery, it will not upload it and just discard the photo.
- Rotate Based on EXIF data - Attempts to read the EXIF data and rotate the photo if needed. Some programs save that data differently so you may need to test this option with both portrait and landscape oriented photos.
- Replace photos with same file name - with this options selected it will replace any photos with the same file names in the gallery.
- Discard original photo files - this option will not save the original photo file uploaded. With this option selected, you will not be able to offer immediate download photos or free photos.
- Do not capture Title, Caption & Keywords from IPTC data - Normally when photos are uploaded, Sytist will read the data from the photo and save it with the photo. Checking this option it will not do that.
- Change Photo Sizes - Your photo size defaults are set in Settings - Photo Settings. You can change the sizes they get resized to at the time of upload with this option.
- Throttle Upload - This option will add a pause between photo uploads. This can be used if you are uploading smaller photos that might be uploading too fast and triggering server security.
Upload Folders to Create Sub Galleries Option
This option will allow you to select a folder of photos to upload with supported browsers. If the folder you select has sub-folders it will automatically create sub-galleries based on the folder structure.
Example, you have a main folder called "Bill & Gloria Wedding" and inside that are folders of photos call Ceremony, Reception, Bride & Groom, etc ... You select the Bill & Gloria folder and it will create sub-galleries Ceremony, Reception, Bride & Groom.
Unfortunately, at this time the selecting and uploading folders does not work with Apple Safari (selecting photos does, just not folders), last tested with Safari 11.0.2. The Safari browser does not support the webkitRelativePath property which is needed to for this to work with folders. It also does not work in Internet Explorer.
Browsers that do support selecting a folder and latest versions tested:
- Chrome (63)
- Firefox (57)
- Microsoft Edge (41)
- Opera (49)
Import Sub Gallery Passwords
After you have uploaded sub galleries and need to password protect them individually, you can import a CSV file to assign the passwords. See this article on importing passwords for sub galleries.
Uploading Photos via FTP
There is also an option to upload photos via FTP then after they have uploaded have Sytist process the photos. See this article on uploading photos via FTP.
Issues Uploading Photos
If you have issues with photos uploading, most likely the photos are too large for the server to process. See this article on issues uploading photos.
Photo Display Settings
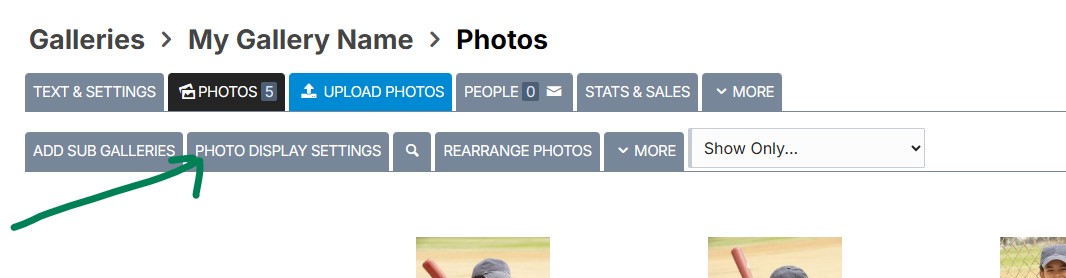
The photo display settings let you control how photos are displayed for the gallery or page. You can also set the default settings on a per section basis. This option is available when you are in the Photos tab when viewing a gallery or page in the admin.
You can have the photos displayed as
- Thumbnail gallery - which would be used for client galleries, portfolios, etc... and has purchasing options.
- Slideshow - Display the photos uploaded as a slideshow. There are no purchasing options with slideshows.
- Scroller - displays photos straight down the page one after another
- Standard photo with minis - mainly used for products in a store section.
Thumbnail Gallery Options
Thumbnail Type:
Justified - this set the thumbnails so each row is even with even spacing between photos.
Row height: the height of the rows. 250 is suggested.
Spacing: the amount of space (in pixels) between the photos.
Standard - Shows your thumbnails in a standard display with styling set in your theme.
Use hover preview when mouse over thumbnail: This shows the photo in a popup when you mouse over the photo.
Stacked - Shows your thumbnails stacked similar to Pinterest with the styling set in your theme.
Use hover preview when mouse over thumbnail.
This option will show the small photo when the mouse is hovered over the thumbnail. This option is not available in the justified type.
Mouseover show file name & icons under thumbnail.
With this checked, it will show the file name and icons when moused over (if available). Unchecked will just display them.
Do not display filename under thumbnail.
Check this box if you don't want to display the photo file name under the thumbnail.
When page is opened, display first photo and start slideshow
With this option checked, when the visitor opens the page, the first photo will display full screen (as if you clicked a thumbnail) and start playing as a slideshow.
Slideshow seconds between photos
When someone clicks to view the photo from the thumbnail, there is an option to play as a slideshow. This is the time the photos are displayed.
Transition time
The time it takes the photos to fade in & out.
Additional Photo Display Options
Enable social share
This enables the ability for someone to share the photo to Facebook, Pinterest, Twitter or email. When someone shares a photo, it sends a link back to the gallery where they can see the photo.
Enable add to favorites
This allows the visitor to add to their favorites. For someone to be able to add to their favorites, they have to create an account and be logged in.
Enable Photo Search
This option allows the viewer to search photos within the gallery. It also adds a link to view all tags of photos in the gallery.
Enable Compare Photos
This allows the customer to select photos and compare them side by side.
Enable Time Blocks
This option will create a drop down of time blocks in a gallery for the visitor to select from and pull up photos based on the date / time taken of the photo. See this article for information on this feature.