Also see these articles
Creating Collections / Packages
Collages & Albums Using Collections
Collection Options
I will assign products to the package
This option means you are going to add products from your product
base and assign the quantity of each product for the collection.
Making selections only
This option you will not select products and the customer will just
be adding photos to the collection. If you just want the customer to be
picking 10 photos for example and not for specific products, you would
select this option.
Including Other Collection
This option allows you to create a collection of other collections. When selecting this option you will only be able to add other collections.
Once you create a collection you have additional options.
Limit Poses
Credit
Require all products to have photo selected
Extra Photo & Extra New Photo
Extra NEW Photo is the price for a pose that has not been added to the collection. This will allow you to charge extra for selecting a new pose.
Important! If you use the Extra Photo & Extra New Photo option, you MUST enter a price for both. If you don't, then they will be able to add photos to their cart for free.
Taxable
Shippable
Adding products to a collection
Collection Thumbnail
Photo Products -> Print Credits
Print credits allow you to offer prints and / or downloads to your customers at no cost.
Basically a print credit is a collection/package so you will need to create a collection first for what is included in the print / download credit in Photo Products - Collections.
When creating a print credit, you select the collection you want included. These collections don't have to be part of any price list.
There is a redeem code created the customer will use to redeem the print credit. Then they can select the photos for their print credit and checkout at no cost unless there are other products or shipping applied.
Enable the Redeem Print Credit link in the menu
 Starting with Sytist version 2.3.0 are download credits which can be found in the admin in Photo Products -> Download Credits. Download credits can be used a couple of different ways.
1: Download credits can be purchased to download photos while browsing. Example: a customer can purchase X number of download credits and while viewing photos, download right then using their credits.
2) You can create redeem codes for clients to redeem the download credits to their account at no cost, then download photos using their credits while they view their photos.
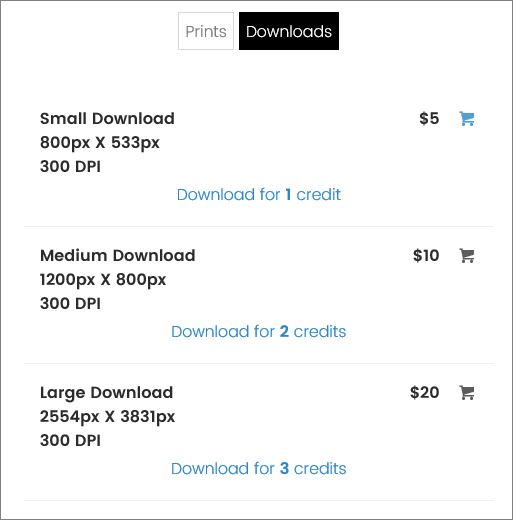
When download credits are available, it will show a link to download the photo and how many credits.
If you use the download credits, you will need to edit your download products in the Photo Products -> Product Base and set how many credits the download costs.
Setting up pricing & settings
Go to the Pricing & Settings section to set up the pricing. You enter in how many credits can be purchased at what cost.
In the display text for the pricing, be sure you enter in how many credits for what amount because that will be the only way they will see the price.
Example: 10 Download Credits for $20
The other settings on the pricing & settings page:
Purchase of download credits taxable
Whether they are taxable or not.
Do not offer option to purchase download credits
Check this option if you don't want to sell download credits and only offering them with redeem codes.
Only show the option to download with credits to people that have credits
This option means only people with download credits redeemed to their account will see the option to use download credits.
Redeem Codes
Create redeem codes to give to your customers so they can download photos using the credits.
If you give out a redeem code, you will need to instruct your customer to log into their account (or create one if one does not already exist), go to the My Account page and select the redeem download credits option.
The create a redeem code, click the Redeem Codes tab in Photo Products -> Download Credits.
Enter in a unique redeem code and how many credits are included.
To create a batch of redeem codes, click the Create a batch of redeem codes option.
Buy Alls are a way for a customer to purchase all photos in a gallery / sub gallery of the same product. Example, purchase all photos in this gallery as a 4x6. Here is an article with examples of Buy Alls.
This option will also allow them to buy all photos in a gallery of the same keyword or tag. Example, someone searches for their number in a gallery and get 12 results. Then they can purchase those 12 photos in a buy all.
These are also used so customers can buy all of their favorites. Note that all photos in their favorites must use the same price list or the buy all option won't show.
Creating a Buy All
Photo Products -> Buy Alls -> Create New Buy All
Start by selecting the product you want this buy all to include and click continue. After you create it you select what type of pricing to use.
Price Per Photo
This option will price the Buy All collection a flat price per photo in the gallery or selected. Example, enter in 5.00 and for each photo in the gallery it will charge $5.00 for.
Tiered Pricing
Tiered pricing will allow you to set a price per photo based on the total photos in the gallery or selected. Using this method will allow you to charge less per photo for more photos in a gallery.
| Qty From | Qty To | Price |
| 1 | 4 | $5 each photo |
| 5 | 10 | $4.50 each photo |
| 11 | 20 | $4 each photo |
| 21 | 40 | $3.50 each photo |
| 41 | 0 | $3 each photo |
IMPORTANT:
- Be sure there is no gaping in your ranges. Example: from: 10 to 19 ... the next from has to start at 20.
- End you last qty to range with a 0.
Naming your Buy Alls
If you add your buy all products to it's own product group marked for buy alls (see next section), then you can simply name them the product name. For example, if the buy all if for a 4x6 print, just name it 4x6.
If you are going to add the buy all product to a product group not marked for buy alls, you will need to name it something like "Buy all photos as a 4x6".
Adding Buy Alls to a Price List
You can add a buy all to any product group in the price list. If you want there is be a button on the gallery page above the thumbnails to buy all photos, create a new Product Group in your price list and select the option you will be placing buy alls in it.
Disable Purchasing of a Buy Alls From Favorites
If you do not want people to purchase a buy all collection from their favorites, view your Price List in Photo Products -> Price List, edit your product group for your buy alls and check the option "Do not offer these buy alls when customer ordering from favorites.
"
In the color option settings, you are able to tweak the amount of Red, Green, and Blur (RGB) of the image that gets laid over the black & white image. You can also adjust the opacity of the original black & white image.

Loading more pages