To install sytist you will need to be able to unzip a zip file, FTP files to your website and create a database in your hosting control panel. If you do not have a FTP program, google "Filezilla" for a good free one. (FTP is a program you use to transfer files from your computer to your website).
You can install Sytist:
In a sub folder
Example: yourwebsite.com/clients
"clients" being the sub folder name.
In the root of your website
Example: yourwebsite.com
You would do this if you plan on using Sytist as your entire website. If you have an existing website, you can still install it in the root and not effect your existing website under you click the "go live" option
In a sub domain
Example: clients.yourwebsite.com
If you install in a sub domain, you will have to create that sub domain first in your hosting control page. BUT BE ADVISED: If you plan on using a SSL / Security Certificate and have it for your main domain, it will not cover your sub domain. You would have to get one for your sub domain also.
You can change where it is installed at a later time if you need to.
Download the zip file
Download the installation files (a zip file) from your order and save it to your computer to a place where you can find it.
Unzip the zip file. Be sure it unzips keeping the folder structure (You should see folders and files)
FTP to your website
Open you FTP program and connect to your website.
Once connected to your website, navigate into the public folder on your website side of the FTP program. The folder could be called "public_html" (for cPanel hosts), httpdocs, etc. Sometimes when you first connect with your FTP program you are already in the public folder.
If you are installing in a sub folder, create that sub folder through your FTP program and then click into that sub folder. Generally your would right click on the server side and select Create Directory.
On the local side of your FTP program (the files on your computer), navigate to the location where you unzipped the installation files. Go INTO the sytist_INSTALLATION_files folder and you will see folders and files that mostly start with a sy- prefix. Select ALL those folders and files and upload them to your website side. (The folders and files INSIDE the sytist_INSTALLATION_files folder)
Create a MySQL database
While the files are uploading, log into your hosting control panel and go to the database section. You will need to create a new MySQL database. When you create a new database, you will have a database hostname (commonly localhost), name, username and password. You will need that information for the next step. Click here on how to create a MySQL database in cPanel.
Go to the install directory
Once the files have completely uploaded and you have created the database, open your browser and go to {YOUR_WEBSITE_DOMAIN}com/install. This is your domain name /install (the install directory).
Example: awesomesite.com/install
Or if installing in a sub folder:
awesomesite.com/folder-name/install
** If you get a page not found, then you probably did not upload the files to the correct place.
On the install page, enter in the database information for the database you created and follow the directions on the page.
One you complete the steps on the install page, you are done! You will be sent to the admin area where you will create your admin username and password and register your sytist.
Starting in Sytist version 0.8.4 is a new auto update feature (so when 0.8.5 comes out you will be able to use it). The upgrade process will take less than a minute.
You will receive a notification on your admin home page that a new update is available. Just click the link to get started.
Basically what happens is it will :
- Attempt to fetch the upgrade zip file from the PicturesPro.com server.
- Unzip the zip file
- Make a backup copy of the Sytist files into a backup folder.
- Move the new files into the correct locations.
After that you just have to refresh your admin page and edit your theme and save to complete it. Screen shots of the process below. If for some reason this fails (due to server restrictions or permissions), you will still be able to manually update.
Click here for the Change Log to view changes in the latest version. Any questions or comments on the upgrade, go to the support forum.
When upgrading, you will not lose any data or customizations.
Important: After you have completed the upgrade, must edit your theme (top menu > Site Design > Edit My Theme) and then click "Save Changes" after you upgrade to apply any new CSS from the upgrade.
If the auto update feature does not work in the admin for some reason (which was added in version 0.8.4), below is how to manually upgrade your Sytist.
To manually upgrade your Sytist
- Log into your PicturesPro.com account and view your order that you purchased Sytist on.
- Click the download link for Sytist and save the zip file to your computer. Unzip the zip file to a place where you can find it.
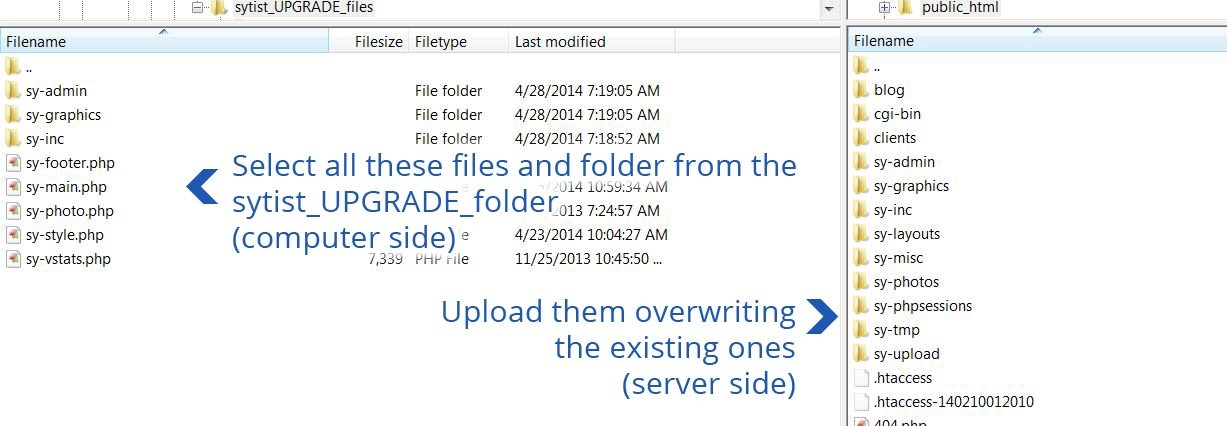
- The upgrade files are located in the sytist_UPGRADE_files folder. Do NOT use the installation files.
- Connect to your website with your FTP program.
- Navigate into the folder where you have your Sytist files located (public_html possibly). You should see existing files and folders with the sy- prefix.
- If your Sytist admin folder is not named "sy-admin", first upload the CONTENTS of the sy-admin folder INTO your admin folder on your website (whatever it is called) overwriting the existing ones.
- Next upload the remaining files and folder(s) into the place where your main files and folders are located overwriting the existing ones.
- After the files have completely uploaded, go to your Sytist admin and it will automatically complete the upgrade. You should notice your current version will change to the new version.
Important: Last, you must edit your theme (top menu > Site Design > Edit My Theme) and then click "Save Changes" after you upgrade to apply any new CSS from the upgrade.
You can export your customer list from Photo Cart to be imported into Sytist starting with Sytist version 0.6.6. When you import the information it will bring in all their information such as name, email, address, password, etc... This does not import information like orders, favorites or galleries.
When importing it will check for duplicates and won't import any account with an email address already in Sytist.
Note: You must be using Photo Cart version 7.1.0 for this to work. If your Photo Cart is not version 7.1.0 either upgrade it first or do not do this.
1) When you download the Sytist files from your order, inside the zip file is an "extras" folder.
2) From the extras folder, upload the pc-clients.php file into your Photo Cart folder on your website. Then view it in your browser.
Example: mywebiste.com/photocart/pc-clients.php
Note your Photo Cart folder may be named something other than photocart.
3) On that page is an export button. Click the button and you will be prompted to save a txt file to your computer. Save it somewhere where you can find it.
4) Delete the pc-clients.php file from your Photo Cart folder.
5) Log into your Sytist admin and click on People in the main menu. Left side of the page click on Import. A file dialog will open. Select the file you saved and click Import.
6) Once it is completed it will show you how many customers were imported.
And your done.
These are instructions for moving an existing Sytist installation into a sub folder or renaming a sub folder.
Moving Sytist files into a sub folder
Select all the Sytist files and folders and the folders created by Sytist (the sections you have created) and drag them into that new folder. All the Sytist files & folders start with sy- with the exception of the index.php or indexnew.php file.
Download the sy-config.php file from your website and open it in a text or php editor. On an empty line before the closing PHP tag ?> add the following line:
$setup['temp_url_folder'] = "/folder-name";
The folder-name is the name of the folder you created. It MUST start with the forward slash (/).Save and re-upload the sy-config.php file.
Changing the Sytist sub folder name
First rename the folder containing the Sytist files through your FTP program.
Download the sy-config.php file from your website and open it in a text or php editor.
Look for the line:
$setup['temp_url_folder'] = "/folder-name";
Change the folder-name to the new name of the folder.
It MUST start with the forward slash (/).
Save and re-upload the sy-config.php file.
Moving a Sytist installation from a sub folder into the root
If you are moving Sytist from a sub folder into the root to make it your main website and you have an existing website, you may want to first create a new folder where your website files are and move your existing website files into that folder as a backup.
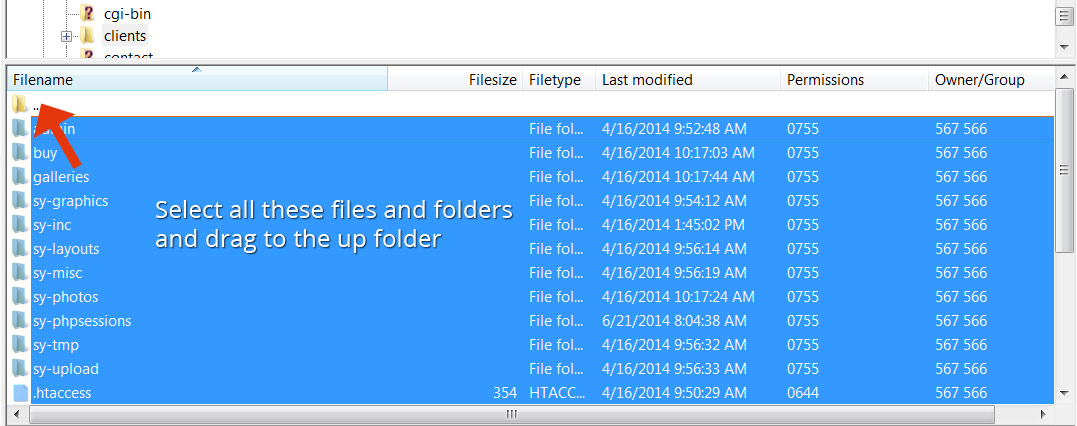
Connect to your website with your FTP program and navigate to the folder you have your Sytist installation in. Select all files and folder and move them up one level by dragging them to the up a level icon.
Then download the sy-config.php file and open it in a text editor like note pad. If you are using a host that has a file manager in cPanel, you can also edit it there.
Look for this line: $setup['temp_url_folder'] = "/folder-name";
Delete that line, save and re-upload.
If some files or folders did not move, then there are existing files / folder with the same name in the folder you are moving to. You should move those files / folders into a backup folder then try to move the files again.
If you are moving an existing Sytist installation to a brand new host and want to retain all the data:
1) Using your FTP program, download all the contents of your Sytist installation.
If it is in a sub folder on your website (like your-website.com/some-folder) then download the entire "some-folder" to your computer.
If it is in the root of your website (Sytist is your main website), select all the files and folders and download those to your computer.
Tip: If you have a lot of photos in your system I suggest you first download everything except for the sy-photos folder then download that one later.
2) Connect to your new host with your FTP program and upload the files and folders there.
3) You will need to export your database and import it into your new host (your database is not located where your files and folders are) then update the sy-config.php file with the new database settings. Here are instructions on how to do this.
After this is all done you should be good to go. If you did not download the sy-photos folder with the rest of the files, then download that to your computer and upload it to the new host. (this can take a long time depending on how many photos and the sizes of the photos).
Site Transfer Service: lovebugsphotographydesigns.com offers a site transfer service. Click here to learn more or contact.
If you wish to just reinstall from scratch (loss all data), download the installation files from your order and contact us to reset your registration key.
To force httpS on all pages (secure pages) you have to have a SSL / security certificate installed on your website. This is generally done by your hosting company. I personally buy mine from godaddy.com, but your host may offer them as well.
Then you need to do 2 things.
1) In your Sytist admin click Settings in the main menu. Then underneath the left menu click edit .htaccess file.
Look for these 3 lines
RewriteEngine On
RewriteCond %{HTTP_HOST} ^(YOUR-DOMAIN.com)$ [NC]
RewriteRule ^(.*)$ http://www.%1/$1 [R=301,L]
If you have those 3 lines in your .htaccess file, replace them with the following. If you don't have those 3 lines then just add the following (replacing YOUR-DOMAIN.com with your domain ... like picturespro.com)
RewriteEngine On
RewriteCond %{SERVER_PORT} 80
RewriteRule ^(.*)$ https://www.YOUR-DOMAIN.com/$1 [R,L]
Save.
2) Next you have to edit the sy-config.php. You can do this in your Sytist admin by click Settings in the main menu, then underneath the left menu click "edit config file".
Change this line:
$setup['url'] = "http://".$_SERVER['HTTP_HOST']."";
TO:
$setup['url'] = "https://".$_SERVER['HTTP_HOST']."";
Notice we are adding a s to http.
And save.
When installing Sytist, you have the option on what to name the admin folder. If you want to rename it after the installation.
1) Download the sy-config.php file from your Sytist installation and open it in a text editor like notepad (Or you can edit it through the file manager in your hosting control panel).
2) Look for the line : $setup['manage_folder'] = "sy-admin";
Change "sy-admin" to the name you want the folder to be ... "my-admin-folder-name". Save and re-upload.
3) Through your FTP program navigate to where you see your admin folder and select rename (right click on the folder) and rename it to the name you entered in your sy-config.php file .... my-admin-folder-name

Loading more pages